Guide: Central Monitoring
This guide provides instructions on how to configure a simple monitoring solution of remote DataZen agents centrally using a cloud database in Microsoft Azure. We will assume that your organization uses a large number of DataZen agents deployed at remote sites, and your objective is to quickly enable your operations team to determine which sites are able to connect to the cloud successfully or determine if a DataZen agent has stopped. A sample PowerBI report will also be provided to show a possible way to display the status of remote sites.
This guide does not make the difference between a site's ability to connect to the cloud and a DataZen agent being stopped. It does however provide a mechanism to quickly identify which sites are having issues.
Implementation
Architecture Overview
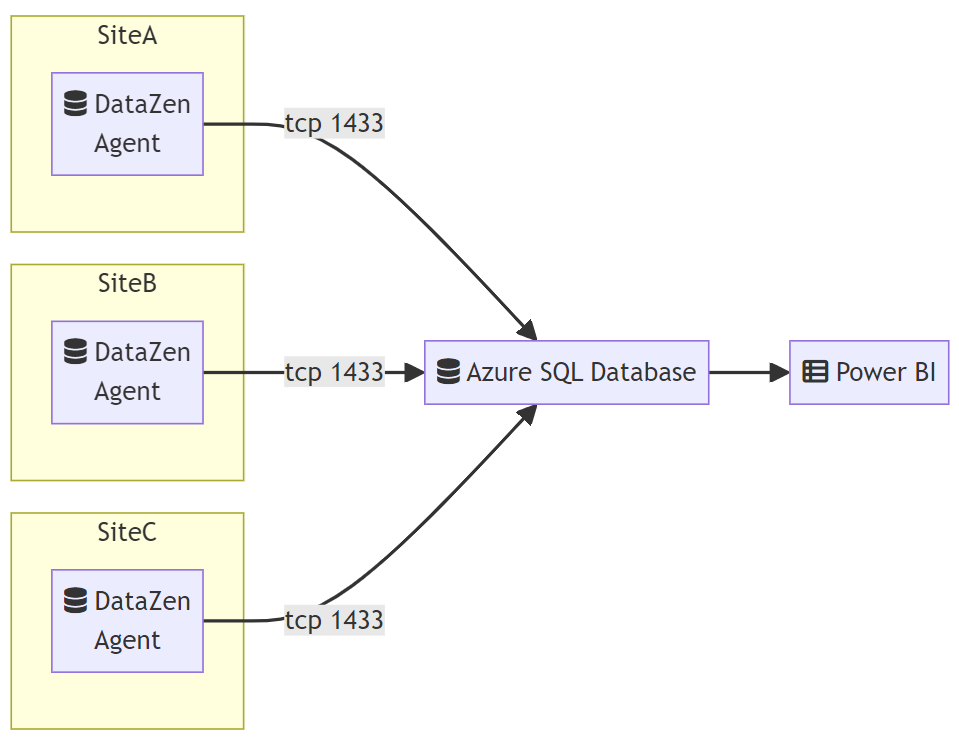
For the purpose of this guide, we are assuming that multiple remote sites are running an instance of a DataZen Agent each, and that all sites have been configured (from a network connectivity standpoint) to allow the DataZen Agent to connect to an Azure SQL Database using a public endpoint. Depending on your environment, you may also use an internal database target without your current network infrastructure, however this guide will assume that each remote site is fully independent (and as a result disconnected).

In this example, three sites are configured to allow DataZen agents to connect to a central database in the cloud. An Azure SQL Database will be used in this example, but any other platform could be used, including Amazon AWS RDS, Google Cloud.
Connecting to an Azure SQL Database requires port TCP 1433 to be opened outbound from all the remote sites if you are using a public endpoint. Although data is flowing through a public Internet connection, all communication is encrypted in transit.
Azure SQL Database Target
Before configuring the DataZen agents, you will need to have a landing database in Azure with database credentials the DataZen agent can use. If you do not have a database available, follow these high-level steps or contact Enzo support for assistance:
- Create an Azure SQL Server first
- Create an Azure SQL Database on your Azure SQL Server
- Create a DataZen login in the master database in your Azure SQL Server
- Create a DataZen user that maps to the login in the newly created database
For specific instructions on how to create an Azure SQL Database, please refer to the Microsoft Azure documentation.
Click here to view the currently published instructions on the Microsoft site.
Creating services in Azure may incur additional costs to your Azure bill. You can use the Azure Calculator to estimate these costs.
Remote Site Configuration
On each remote site, you will need to create a database connection and a Direct Job as explained below.
Database Connection

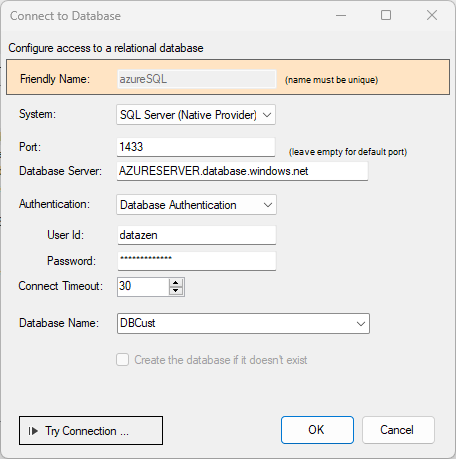
The Database Server should end with database.windows.net when specifying an Azure SQL Database endpoint. Make sure to type the expected database name where DataZen will connect, and specify a database login that has sufficient rights to create tables, write data, and modify table schema information for the best experience.
Click the Try Connection... button to ensure you can connect to the database successfully.
You may create the target table manually first in the Azure SQL Database, in which case you would only need write access to the database.
Direct Job
Next, you will need to create a new Job on your DataZen Agent that will connect to the Azure SQL Database table and update (or create the first time)
a unique record that will identify this agent instance. It is normally best to identify the agent instance using a clearly identifiable name, such
as the name of the site (ex: New York), or a Lat/Long location, or both. This information will be different for every remote site.
To create the job in DataZen, copy and paste the JSON document below into DataZen directly. If you named the target database azuresql it will be
automatically selected; if not, you will be prompted to select it from a list of connections previously created on your DataZen agent.
The target database table, called remotesites, will be created automatically the first time the job runs.
Before saving this job, make sure to review or change:
- The 'site' value
- The 'latitude' and 'longitude' value (or remove if unnecessary)
- The schedule (this job is designed to run every 5 minutes)
- The target table if a different name is desired
{
        "JobReader": {
            "Guid": "",
            "JobKey": "RemoteSiteMonitor",
            "SqlRead": "SELECT \n   'New York' as site, \n   CAST(40.730610  as numeric(10, 7))  as latitude,\n   CAST(-73.935242  as numeric(10, 7))  as longitude,\n   GETUTCDATE() as updatedOn",
            "Path": "C:\\",
            "UpsertColumns": "site",
            "TimestampCol": "",
            "LastTsPointer": null,
            "LastTsDelPointer": null,
            "ConnectionString": "azureSQL",
            "PropagateDelete": false,
            "SyncStrategy": "Full",
            "CreatedOn": "2024-01-01T01:00:00.000",
            "Status": "ready",
            "Initialize": false,
            "Active": true,
            "LastRunTime": "2024-01-01T01:00:00.000",
            "CronSchedule": "0 */5 * ? * *",
            "JsonData": {
                "AuditLogEnabled": true,
                "KeepChangedLogFiles": false,
                "EncryptionFile": "",
                "BypassTopN": true,
                "TopNOverride": 0,
                "DirectWriter": "__RemoteSiteMonitor",
                "ExecutionTimeout": 0,
                "BypassSchemaDetection": false,
                "DeletedRecordsMethod": 0,
                "DeletedRecordsSQL": null,
                "CDCTokenDeletedField": "",
                "MessagingOptions": null,
                "DriveSourceSettings": null,
                "Column2TableTxSettings": null,
                "HttpSourceSettings": null,
                "BigDataSourceSettings": null,
                "JobTriggers": [],
                "JobTriggersEnabled": false,
                "CDCSettings": null,
                "DynamicParameter": null
            },
            "Tags": "monitor",
            "SystemName": "SQLServer",
            "PipelineDef": []
        },
        "JobWriter": {
            "Guid": "",
            "JobKey": "__RemoteSiteMonitor",
            "Path": "C:\\",
            "UpsertColumns": "site",
            "ConnectionString": "azureSQL",
            "PropagateDelete": false,
            "SourceJobKey": "RemoteSiteMonitor",
            "LastExecutionId": "1705595472843",
            "InitialExecutionId": "",
            "CreatedOn": "2024-01-01T01:00:00.000",
            "Status": "running",
            "Active": true,
            "LastRunTime": "2024-01-01T01:00:00.000",
            "CronSchedule": "0 */5 * ? * *",
            "JsonData": null,
            "TargetSystem": "SQLServer",
            "TargetObject": "remotesites",
            "UpsertScript": "",
            "DeleteScript": "",
            "LastSchemaHash": "",
            "Options": {
                "ExecTimeout": 0,
                "BatchCount": 1000,
                "InitScript": "",
                "FinalScript": "",
                "AutoAdjustTargetSchema": true,
                "AutoAdjustNewColumns": false,
                "AutoAdjustExistingColumns": false,
                "AutoAddTrackingDateFields": false,
                "AuditLogEnabled": true,
                "ErrorHandling": {
                    "ActionOnFail": 0,
                    "RetryCount": 0,
                    "RetryTTLSeconds": 0,
                    "RetryExponential": false,
                    "DeadLetterQueuePath": ""
                }
            },
            "SystemName": "SQLServer",
            "PipelineDef": null,
            "Tags": ""
        }
    }
PowerBI Report
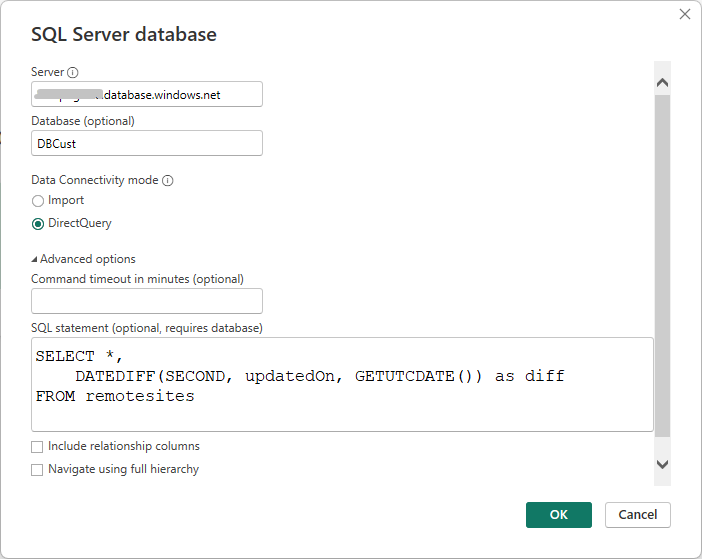
The simplest way to create a PowerBI report is to use PowerBI Desktop. You will first need to
create a new SQL Server Connection to your Azure SQL Database in PowerBI. To do so, choose Import Data from
SQL Server, and provide your database connection information.

When prompted, enter the following SQL statement:
SELECT *,
    DATEDIFF(SECOND, updatedOn, GETUTCDATE()) as diff
FROM remotesites
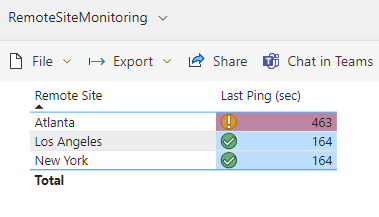
Once deployed and running, your PowerBI Report could look something like this, showing you the latest
Ping status in seconds, and displaying a cell Orange or Red when a remote site has not updated its record
within 5 minutes.


